Implement dark mode using flutter provider
Assuming that you have a basic understanding of how apps are built using flutter framework , lets get to work
We will be dealing with Flutter provider package
which helps in state management feature of our app , the question is why do we need state management after all? As our application gets more and more complex we need an efficent way to share and manage data between screens(widgets more specifically) which doesnot make our code messy !
In simple words , if you have some data then all the place where that data is needed is taken from a common place so that any change in the data will be affected immidietlely as soon as it is made at one place
This also helps in the seperation of business logic from our UI so that they are not coupled together, this kind of approach also helps in the easy maintanance of our code in future .
Flutter has several methods to achieve this, Provider is one among them. Provider is described as :
A dependency injection system built with widgets for widgets. provider is mostly syntax sugar for InheritedWidget, to make common use-cases straightforward
We are mainly going to deal with Provider<T> class. Now that we have seen about provider package lets see what our app does

- Our app fetches weather data from openweathermap api by taking the location of phone and displays the same .
- It also has a dark mode setting which enable dark theme in app
Lets look at how we can arrange our code files in a way that it can be managed easily

Here we have two folders :
Bloc : Business Logic files are placed here
Screens : UI files are placed here
It seems to be a good practice to divide your screen into multiple widgets. Doing so will make our ui code easy to understand
Making use of Provider:
As you can see our app UI and Business Logic are not placed in same place but as seperate modules
To achieve this we need the following steps
- Create a class that extends ChangeNotifier


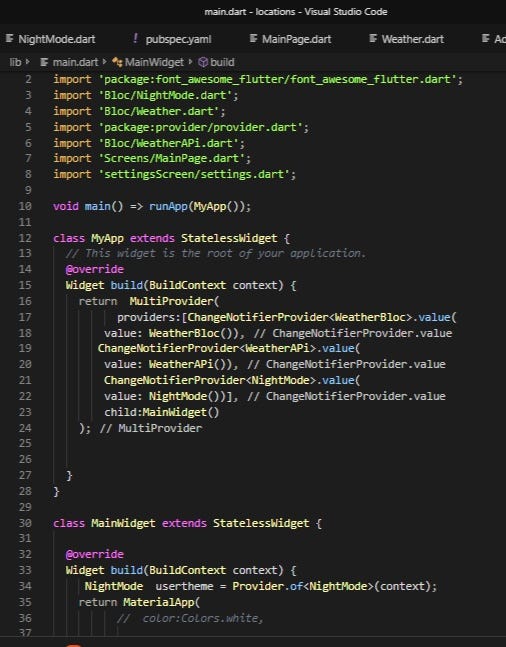
- Use Provider or MultiProvider as parent widget as you can see here multiprovider is the parent widget , this is because providers are basically inherited widget so any change in data would be informed to all the widgets below it that listens to the provider
MultiProvider takes a list providers and child property takes a widget , here we return a widget which contain MaterialApp
To get data we need to initailaze the object of class which extends ChangeNotifier where we need it

Line 11 shows initialization and and line 23 shows how value of address is taken , this value will be updated automatically when ever there is a change . Here we get the address of current location it is important to see that we donot explicitly call setState() here.
Before moving on to testing the app we need to do one more thing , the notifyListeners() method . notifyListeners() should be called when ever value changes so that it would tell the widgets to rebuild and show the updated data.

Our WeatherBloc class has a method called getContinousLocation() which will fetch the address of current location , on line 44. Here we have called the notifyListeners() method so that where ever we have used the location_addreess(see class definition ) variable with help of provider would change its value automatically as soon as we get the data
Adding Dark mode Feature

We will use the same method as above to add this feature to our app.Enabling the option would suddenly change the apps theme to dark . We will make use of ThemeData.dark() and ThemeData.light() methods.
We will make a class called NightMode by extending ChangeNotifier
getTheme() method gives the theme user opted and setTheme() sets the app theme depending upon on the state of check box
we will then make use of shared_prefernces package to store the user selection so that the selected theme remains untill it is changed again.
Class definition for dark theme


and in the material app we will make use of getTheme() method to get user selected theme which will automatically update (Line no :38) in the above screen shot

Our app will look like this in dark mode . You can also use custom colors if needed
For complete code reference check this repo
dependencies used :
- provider
- shared_preferences
- location
Check out : Deploy Ml models using flask and access it through a flutter app
